Deleting the files using Shift+Del keys, Windows Command Prompt, Windows explorer or a compliant application or formatting the drive does not mean that the data has been permanently deleted. It only removes the entry or pointer used by the file system in order to locate that data physically on the hard drives. The data remains on hard drive until and unless the data is overwritten by other data. So, there is always a chance that the special data recovery tools can restore deleted data from the hard disk drives.
Hard drives are generally used to store different types of information. You may have saved credit card numbers, household budgets, tax information, business and personal data. When you want to sell or dispose the hard drive that contains critical data, then you need to delete whole data permanently to avoid unauthorized access to important data. As simply deleting the data using file management utilities does not permanently erase the data, you should use wipe disk software to securely vanish the data from the hard drive. This utility overwrites the data multiple times. If you have used your portable storage drives like fUSB flash drives, external hard drives to transfer data then you may want to wipe it. You can even erase flash drive data using the utility by plugging the drive into the computer's port.
The different versions of Windows Operating System like Windows 2000, Windows Vista and Windows XP provides command line utility known as CIPHER.EXE. This utility overwrites the data in unallocated clusters including decrypting, encrypting and controlling encrypted files using EFS (Encrypting File System). CIPHER.EXE fills the unallocated space with random binary values and can overwrite many times. But, most of the data recovery tools are able to recover data from hard drives that are wiped using CIPHER.EXE. Because, CIPHER.EXE does not affect the data in alternate data stream or file slack.
If you want to permanently delete each and every file then you need to use reliable drive wiping tool that uses US DoD (Department of Defense) security standard to erase the data. The overwriting process under these security standards should go through at least 3 passes. This tool can also erase data permanently from your computer hard drive on all the latest versions of Windows operating system. In first pass, it overwrites the data with a character, second pass with the complement of first character overwrite and in third pass, it uses random character to overwrite the data. You can erase laptop hard drive data permanently from Dell laptops.
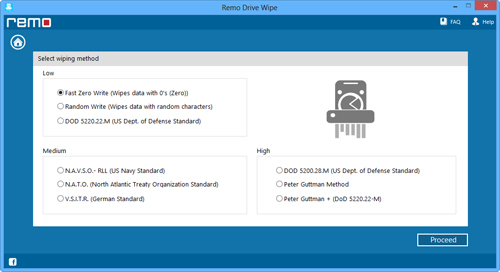
Drive Wipe program is a popular product broadly used to wipe disk in Windows. This software overwrites any data several times on Windows hard disk drives and other storage media, especially those that are being resold or disposed of. This software can also overwrite the ambient data storage areas like file slack, unallocated file space etc. Along with US DoD security standard, it also uses 8 other security standards like Fast Zero overwrite, Random Overwrite, Peter Guttmann Secure Deletion, NATO standard, German:VSITR, US navy etc. These 9 standards are categorized based on their security level like low, medium and high. You can select appropriate standard to wipe the disk securely and permanently. The software also helps in wiping specific logical drive permanently. Moreover, it can also wipe free space from hard drive.
In order to wipe the disk completely, follow below mentioned steps:
Step 1: Download Drive Wipe and install it. Launch the software
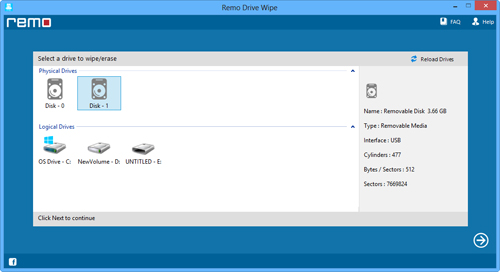
Step 2: Once the software is launched, the main windows is displayed with the list of logical drive and physical drive as shown in Figure 1. Select the logical drive if you want to wipe the specific logical drive otherwise select physical drive from the list to completely wipe the entire physical hard drive and then click on “Next” button

Figure 1: Select the logical drive
Step 3: Now, select the suitable sanitization standard from the next window and then click on “Next” button as shown in Figure 2

Figure 2: Select shredding pattern to wipe the drive in Windows
Step 4: After clicking on “Next” button, a confirmation message will appear. In order to continue erasing process of selected hard drive, click on “OK” button